limestone tiles

Limestone Kitchen Floor Cleaned and Sealed Brighouse

Limestone kitchen floor in Brighouse

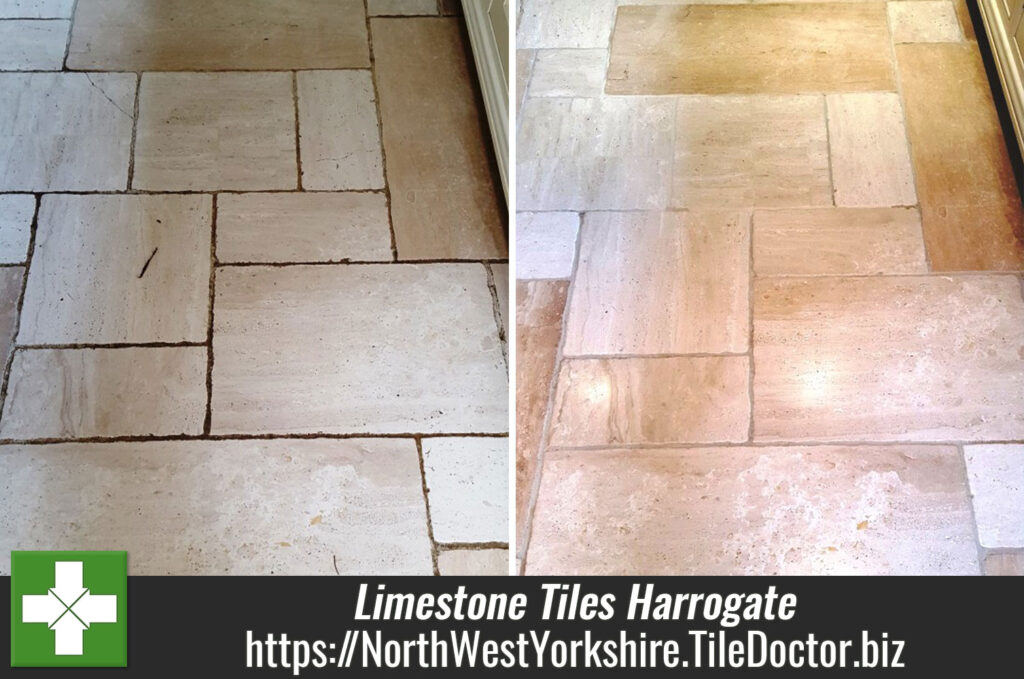
This limestone floor in the kitchen at a property in Brighouse was laid over five years ago and since then the sealer had worn off allowing dirt to become ingrained in the stone and grout lines. It now needed to be deep cleaned with attention to the grout lines and then sealed to protect it going forward.

Limestone Kitchen Floor Before Cleaning Brighouse

I visited the property to survey the floor and work out a restoration plan that would renovate the stone back to its original condition. The work required was straight forward so it didn’t take long to work out a quotation for the renovation.

Happy with the quote we agreed a date for my return.

Cleaning a Limestone Tiled Kitchen

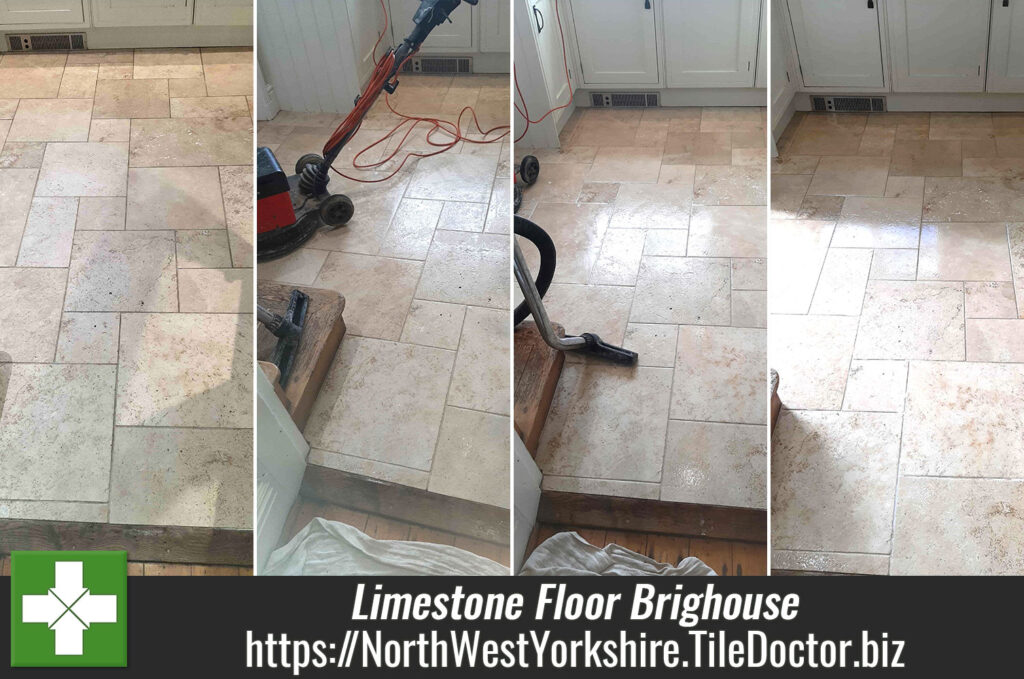
To deep clean and renovate the Limestone I used a set of 17-inch diamond burnishing pads which included 400, 800, 1500 and 3000 grits. Before I could get to work though the wooden kitchen units had to be protected from the cleaning solutions by applying a thin line of clean silicone sealant between the floor and the base boards. Doing this ensures water doesn’t soak into the wood where it can cause them to warp.

The Kitchen was quite small and the equipment proved to be a challenge to operate in such a confined space. I was using a weighted rotary floor buffer and triple motor wet vacuum, so extra care was needed.

I began the stone floor cleaning with the application of a 400-grit pad fitted to a rotary buffer and ran over each tile four to five times using water for lubrication. The soiling generated from this action was then extracted with a wet vacuum and I turned my attention to the grout lines.

Limestone Kitchen Floor During Cleaning Brighouse Limestone Kitchen Floor During Cleaning Brighouse

To clean the grout, I used a strong dilution of Tile Doctor Pro-Clean which was left to soak into the grout for ten minutes before being scrubbed by hand along joint lines. This was then rinsed off and extracted as before. Switching back to the limestone floor the burnishing work continued with the 800 and 1500 grit pads, applied as before with water for lubrication and rinsing and extracting afterwards.

After the end of the first day the floor looked much cleaner, and it was left overnight to dry out.

Sealing a Limestone Tiled Kitchen

The next day I continued with the stone burnishing using the last pad in the set which is a very fine 3000-grit pad that adds a nice polish to the limestone. This pad is applied dry with only a small amount of water sprayed onto the tiles. This last pad leaves the floor dry and ready to be sealed.

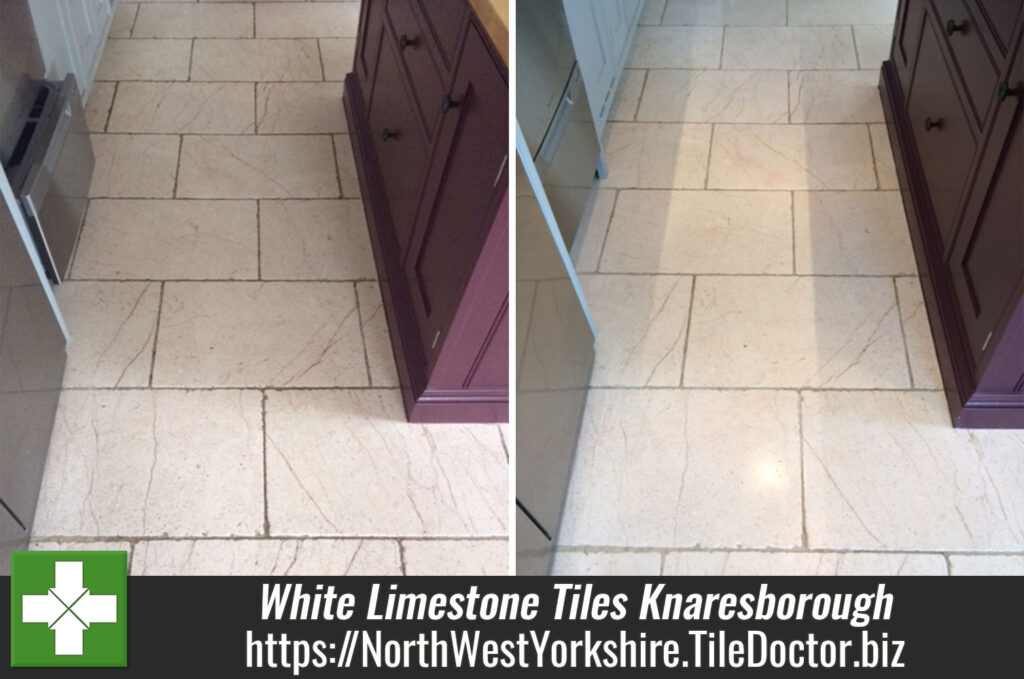
The floor was then sealed with Tile Doctor Ultra-Seal which was chosen to keep the floor looking as close to its natural light colour as possible. Ultra-Seal is a virtually invisible sealer that soaks into the pores of the stone protecting it from within and works well on limestone.

Limestone Kitchen Floor After Renovation Brighouse

The client was very happy with the result and the finish, and the new sealer would ensure dirt remains on the surface of the stone where it can easily be cleaned away with a product such as Tile Doctor Stone Soap. I always recommend this product for cleaning polished stone floors as its formula helps maintain the patina.

Limestone Kitchen Floor After Renovation Brighouse


Professional Restoration of a Limestone Tiled Kitchen Floor in West Yorkshire

Limestone kitchen floor in Brighouse Read More »

Limestone Tiled Floor Before After Renovation York

Restoration Clean of a Limestone Tiled floor in York

The pictures show a large Limestone floor laid through much of the ground floor of a property situated on the outskirts of York seventeen years prior.

Limestone Tiled Floor Before Cleaning York Limestone Tiled Floor Before Cleaning York

The owners had three dogs that slept in their own doggy room. The floor in this room was in the worst condition of the five rooms as it had been subject to significant wear and tear. The Limestone tiles looked dull with ingrained dirt and the grout was stained and patchy.

Limestone Tiled Floor Before Cleaning York

The original tiler had laid the floor well, but he had applied a satin topical sealer to the stone most of which had worn off over the years. A floor like this would need a little maintenance and the sealer reapplying from time to time to maintain it.

I completed a test clean for the client to show them what could be achieved which came out well. Happy with the result they accepted my quote for the restoration work, and we booked in a suitable time to complete the work.

Cleaning a Limestone Tiled Floor

The area was quite large, so I separated the job into rooms and started by protecting the skirtings and woodwork from splashing etc. I decided to do a chemical clean first to remove what was left of the old sealer but more importantly to give the grout a thorough clean which was making the floor look scruffy.

For this I opted to apply a strong dilution of Tile Doctor Pro-Clean which was left to dwell for a short while and then worked in with a mechanical rotary cleaner. It gets to work on the ingrained dirt and sealer. It should also help to get rid of the doggy smells. This process turns the cleaning solution black and is then extracted using a wet vacuum keeping the mess to a minimum. I paid particular attention to the grout which was deeply discoloured and found that some areas required going over a couple of times to get them clean. I was only just getting started on the cleaning but immediately the floor was looking so much better.

I then deep cleaned the Limestone with a set of diamond burnishing pads, working in sequence from the 400 grit through to 1500 grit. A small amount of water was used to aid the lubrication and after each pad have been over the entire area few times the solution is rinsed off with more water and extracted with the wet vacuum.

The floor came back to almost new and as the client wanted a satin finish, I ended by applying a 3000-grit pad to add a deeper polish to the Limestone. The floor was then left overnight to dry.

Limestone Tiled Floor After Cleaning Sealing York

Sealing a Limestone Tiled Floor

The last step of polishing with the 3000-grit pad already leaves the floor quite dry however I always like to check before sealing so just to be sure I took some reading with a damp meter. The readings were fine, so I started applying the first of two coats of Tile Doctor Ultra Seal to finish the floor. This is an impregnating sealer (as opposed to the previous topical sealer) that soaks into the stone protecting it from within but without affecting its appearance. This product was chosen in consultation with the client who was specific about how they wanted to floor to look.

Limestone Tiled Floor After Cleaning Sealing York Limestone Tiled Floor After Cleaning Sealing York

The floor now looked superb. Both the client and l were very pleased with the finished floor and so where the dogs! For aftercare I recommended Tile Doctor Stone Soap which is designed for cleaning polished stone floors like these, it’s a gentle stone cleaner that helps maintain the patina and ideal for this type of floor.


Professional Restoration of a Limestone Tiled Hallway in North West Yorkshire

Restoration Clean of a Limestone Tiled floor in York Read More »

Burnishing and Sealing Works Wonders for Limestone Tiles in Harrogate

Burnishing and Sealing Works Wonders for Limestone Tiles in Harrogate

I was recently at a property in the North Yorkshire town of Harrogate, undertaking what I initially thought would be the cleaning and polishing of a Cream Limestone tiled kitchen. However, as I began the cleaning process I quickly discovered that under the dirty grout lines someone had taken a lot of effort to paint with a small brush directly onto the grout using varnish!

Cream limestone floor before cleaning Harrogate Cream limestone floor before cleaning Harrogate

Removing Varnish from Grout

In a normal situation, I would have covered the whole floor with Tile Doctor Remove & Go to solve the problem, however compared to, say, adhesive or paint staining, varnish is very difficult to remove. So instead I opted for the long, yet necessary process of cleaning the grout manually with several thin wire brushes. Over the course of two days I managed to remove approximately 90% of the stubborn varnish – and could finally move onto cleaning and polishing the Limestone as originally planned.

Burnishing and Sealing a Limestone Tiled Kitchen Floor

The polish had been lost from the Limestone kitchen tiles over time, so I set about restoring it using a type of polishing known as burnishing. This involves the application of diamond encrusted pads of varying grit to the floor to gradually buff the stone and achieve an aesthetic and durable shine. Burnishing is most commonly used on high-end stone such as Marble, Travertine and, of course, Limestone.

At Tile Doctor, our burnishing system comprises four burnishing pads, ranging from a Coarse grit to a Very Fine grit. After applying the first three pads (Coarse, Medium and Fine), I gave the tiles a further clean with Tile a Doctor Pro Clean, which is our alkaline cleaner, to remove any residue from the burnishing process. I then rinsed the floor with clean water and soaked up the residue with a wet vacuum, before leaving it to dry.

The floor was then polished to a satin finish using the fourth and final Extra Fine burnishing pad. I sealed it using a couple of coats of Tile Doctor Ultra-Seal, an impregnating sealer designed to provide maximum protection against dirt and stains.

Cream limestone floor after cleaning Harrogate Cream limestone floor after cleaning Harrogate

The combination of burnishing and sealing always makes a huge difference to Limestone tiles. Here, the finished result was almost like a new floor! The customer was both amazed and very pleased with the transformation.

Professional Maintenance of Polished Limestone Tiles in North Yorkshire

Burnishing and Sealing Works Wonders for Limestone Tiles in Harrogate Read More »

Dirty White Limestone Tiles Restored Through Burnishing in Knaresborough

Dirty White Limestone Tiles Restored Through Burnishing in Knaresborough

Knaresborough is a historic town in North Yorkshire, popular amongst holiday goers for its numerous attractions. I travelled to the area not to visit the attractions, however, but to visit a customer, whose fantastic white Limestone tiled floor was in need of a deep clean.

White Limestone Floor Before Cleaning in Knaresborough
Limestone is a porous material, meaning that without a sealer dirt can become easily trapped in the pores of the stone, as well as the grout. With this Limestone being naturally white, the dirt was particularly visible, making the tiles look very unsightly. Once deep cleaned the floor would also require a fresh seal to provide long-term protection against muck and stains.

White Limestone Floor Before Cleaning in Knaresborough

Burnishing a Dirty White Limestone Floor

To treat high end, polished stone floors such as Limestone and Marble, we recommend using the process of burnishing. Simply put, burnishing involves the application of diamond encrusted pads of varying grits, which serve to break down dirt and then polish the stone.

Typically, we use a set of four pads in gradual succession; here, I used the first three pads on the first day. Starting with the Coarse grit pad, along with a little water as lubrication, I polished the Limestone, before repeating the process with Medium and Fine pads to refine the polish.

On the same day, I also cleaned the grout using a solution of one part Tile Doctor Pro-Clean (a high alkaline cleaner) and three parts water. On Limestone floors you should take care to avoid even mildly acidic cleaning products as sensitive stones like Limestone and Travertine can be damaged over time. After successfully cleaning the dirt grout lines, I rinsed the floor before using a wet-vac machine to soak up the residue. The floor was then left to fully dry overnight.

Sealing a White Limestone Floor

The next day, I returned to the property to complete the restoration. Before sealing the tiles, I applied the fourth and final of the burnishing pads to achieve a Very Fine polish.

White Limestone Floor After Cleaning in Knaresborough
To seal the tiles, I used Tile Doctor Ultra Seal, the customer didn’t want to darken the stone in the way that a colour enhancing sealer might. Additionally, the customer required a more natural finish, which this product provides.

Then, I polished the excess sealer off with a white buffing pad and left it to dry for an hour, before polishing a final time with the Very Fine grit burnishing pad. With this method, the floor was perfectly dry and the customer could walk on the tiles as soon as I left.

White Limestone Floor After Cleaning in Knaresborough
Before leaving my very satisfied customer to enjoy their newly restored Limestone floor, I made sure to impart some aftercare advice. I recommend Tile Doctor Stone Soap for the Limestone (and other polished stone) as its helps to retain the sheen whilst also acting as a general cleaning agent.

Polishing White Limestone Floor Tiles in North Yorkshire

Dirty White Limestone Tiles Restored Through Burnishing in Knaresborough Read More »

Scroll to Top