Leeds

Soot-Stained Limestone Fireplace Renovation Guiseley Yeadon

Soot-Stained Limestone Fireplace Renovated in Guiseley

Detailed below is the cleaning of a Limestone Fireplace surround and hearth at a property in Guiseley near Yeadon on the outskirts of Leeds. Soot

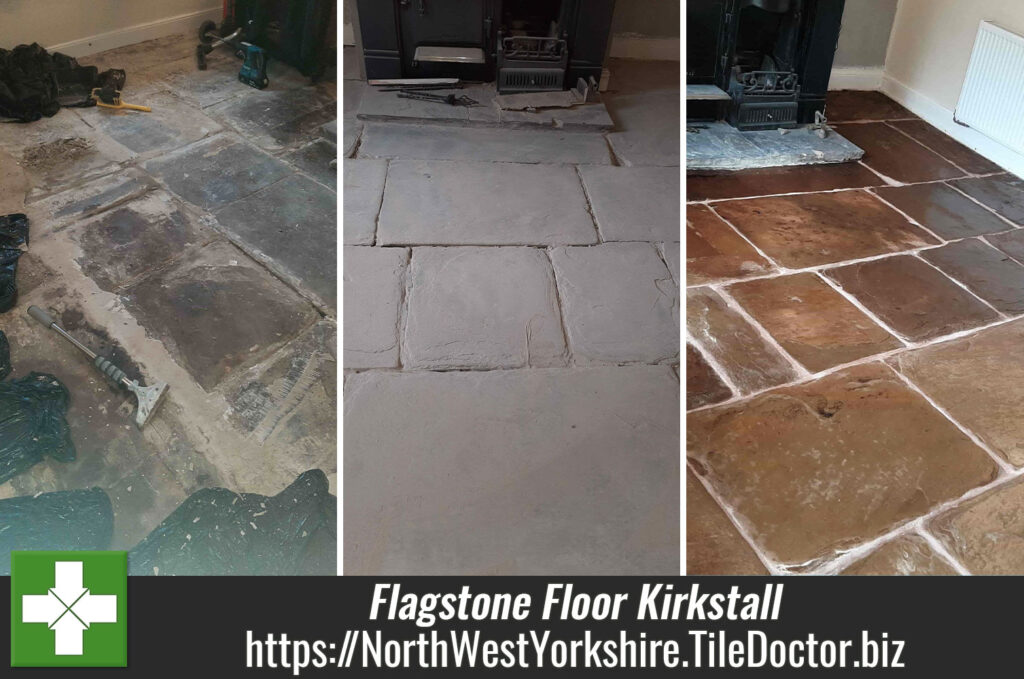
The fireplace had been installed approximately five years prior and was now badly stained with soot and smoke from the wood burner and this readily stood out against the pale Limestone. Having decided to do something about it the owner tried cleaning it but was unhappy with the result and decided to call in some professional help.

Soot-Stained Limestone Fireplace Before Cleaning Guiseley Yeadon

Happy to oblige I was able to provide a quote based on photographs which was accepted and a date scheduled for the renovation which would only take a few hours.

Cleaning a Limestone Tiled Fireplace

Work started by adding protection to the surrounding carpets and the metal work of the log burner. Then to get the Limestone clean I decanted a strong dilution of Tile Doctor Pro-Clean into a spray bottle and sprayed it on to the stone. The spray mixes the solution with air making it lighter and more able to stick to the vertical surface. You can also use Tile Doctor Oxy-Gel for this which is a similar gel-based product. After leaving it to soak in for ten minutes the solution was worked in, using handheld diamond blocks of increasing grits.

Soot-Stained Limestone Fireplace During Cleaning Guiseley Leeds

Sealing a Limestone Tiled Fireplace

Once dry, the fire surround and hearth were sealed with Tile Doctor Ultra-Seal sealer to help protect from more soot. This is an invisible sealer that works by soaking into the pores of the Limestone protecting it from within. This keeps dirt and contaminants on the surface where they can be easily cleaned away with a product such as Tile Doctor Stone Soap. It’s important to use a pH neutral product for the regular maintenance cleaning
of sealed stone as stronger products will erode the sealer prematurely.

Soot-Stained Limestone Fireplace After Cleaning Guiseley Leeds

Once complete the Fireplace looked like new again much to the delight of the homeowner who left the following 5 Star feedback for me:

“Limestone Fireplace in the lounge is very badly stained with soot and smoke. Got in touch with Chris Allen and he did a splendid job bringing it back to its original state. Excellent craftsmanship and kept us informed of what was going on and how to care for the Fireplace in future. Very knowledgeable and lovely gent to have done the work.”


Professional Renovation of a Limestone Fireplace in Northwest Yorkshire

Soot-Stained Limestone Fireplace Renovated in Guiseley Read More »

Scratched Travertine Table Polishing Morley Leeds

Polishing Scratches out of a Travertine Tabletop in Morley near Leeds

The photographs below are of a scratched Travertine table at a property in the Morley area of Leeds that I was asked to look at. The tabletop had been cleaned but not with the correct neutral cleaners and had some wear and scratches. The result was over time the tabletop lost its shine, and its owner now wondered if it could be cleaned and polished to restore its appearance.

Scratched Travertine Table Before Polishing Morley Leeds

I was confident that the burnishing pads that we use to polish Travertine floors would work equally well on a stone table and fortunately Tile Doctor provides six-inch version of the pads for this situation.

Cleaning a Travertine Table

Before starting I laid down a protective sheet on the floor and created a boundary around the tabletop with protective tape. Water is used in the burnishing process, and I wanted to prevent this from escaping onto the walls and floor.

I tackled the scratches first by applying a coarse 400-grit burnishing pad attached to a hand-held buffer. Water is used to help lubricate the process and once the pad had been applied to the whole table the soiling generated was sponged off the surface. I then inspected the scratches and where needed polished them out further using coarser hand-held burnishing blocks.

Scratched Travertine Table During Polishing Morley Leeds Scratched Travertine Table During Polishing Morley Leeds

Next, I started the process of rebuilding the polish on the table by applying the finer six-inch burnishing pads in sequence starting with 800 then 1500-grit. Each pad was applied with water and then the soiling sponged off afterwards as before. To finish the polishing a very fine 3000-grit pad was applied using a little water to achieve a spray burnish.

Sealing a Travertine Table

This last pad leaves the Travertine dry so it wasn’t long before I could move onto the last step and applying a protective sealer to the table. Having walked through the different sealers and finishes with the client earlier we had chosen Tile Doctor Ultra-Seal to seal the table which is an impregnator that doesn’t alter the appearance of the stone and leaves a very natural finish.

Impregnating sealers work by soaking into the pores of the table preventing dirt from residing there and thereby protecting it from within. This ensures dirt remains on the surface where it can be easily cleaned away.

Scratched Travertine Table After Polishing Morley Leeds

Once the sealer had dried the work was complete and the beautiful, polished appearance of the Travertine table had been restored. My client was very pleased with the result and left the following feedback:

Chris was very polite, attended punctually and was a clean worker, taking precautions to prevent dust and keep the surrounding area clean. The table looks like new. Thank you, Chris.

For the aftercare of sealed and polished stone table and countertops we recommend the use of Tile Doctor Stone Patina Spray. This is a specially designed spray and buff cleaner that helps maintains the patina on the stone without impacting the sealer.


Professional Restoration of a Travertine Table in North West Yorkshire

Polishing Scratches out of a Travertine Tabletop in Morley near Leeds Read More »

Flagstone Floor Restoration Kirkstall Leeds

150 Year Old Carpet Covered Flagstone Floor Transformed in Kirkstall Leeds

The new owners of this property in Kirkstall near Leeds discovered this 150 years old Flagstone floor under carpet shortly after moving in. Keen to have it restored as an original feature I was asked to quote for restoring it back to its original condition, or as close to that as possible given its age.

As you can see from the photos, the stone itself was very dirty and had lost all of its character. Other problems included the removal of the old glues used to secure the carpet, and the latex screed that had been used to level it and even some nails.

Flagstone Floor Before Renovation Kirkstall Leeds Flagstone Floor Before Renovation Kirkstall Leeds

To restore the appearance of the floor I recommended milling the floor with a set of very coarse diamond pads that would remove a thin layer of stone off the top and reveal new stone underneath. I would use water to help lubricate the process and keep the dust down, but it would still be a messy a job, the advantage however would be the stone would be transformed by the process.

Although difficult to comprehend I was able to show them some examples of similar floors that had received this treatment. Happy with the potential outcome the quote was accepted, and a date set for the work to begin.

Cleaning a Flagstone Tiled Living Area

The first job was to remove as much of the adhesives and latex screed as possible from the floor. This was done using Tile Doctor Remove and Go to soften them before being scraped off manually and with the help of a coarse 50-grit diamond pad. The floor was then rinsed to remove the slurry that was generated and then extracted using a wet vacuum.

Flagstone Floor During Renovation Kirkstall Leeds

A set of milling pads were then attached to a weighted floor buffer and run over each slab several times to cut through the stone surface. Water was used to lubricate the process, however as mentioned earlier this process generates a lot of stone dust so a lot of rinsing and extracting needs to happen to remove it.

Flagstone Floor During Renovation Kirkstall Leeds

I used a lot of water during the milling and It’s important that the floor is dry before sealing so I left the floor for a few days before returning to apply the sealer.

Sealing a Flagstone Tiled Living Area

Old floors like this don’t have the benefit of a damp proof membrane so it is important to use a fully breathable sealer that will allow moisture to rise through the floor so it can evaporate at the surface. Failing to observe this can result in damp building up under the floor where it can reach out to the walls resulting in rising damp.

With this in mind I chose to seal the floor using two coats of Tile Doctor X-Tra Seal which is a fully breathable impregnator. It’s also oil-based so it adds structure and colour to the stone really bringing it to life.

Flagstone Floor After Restoration Kirkstall Leeds

The work not only restored the flagstones but completely transformed the floor, the flagstones now have an impressive depth of colour that was simply unimaginable at the start, needless to say my client was extremely happy.

Flagstone Floor After Restoration Kirkstall Leeds

For aftercare cleaning I recommended Tile Doctor Neutral Tile Cleaner which is a gentle but effective tile cleaner that won’t impact the longevity of the sealer.


Professional Restoration of a Flagstone Floor in North Yorkshire

150 Year Old Carpet Covered Flagstone Floor Transformed in Kirkstall Leeds Read More »

Faded Black Limestone Renovated Horsforth Leeds

Colour Restored to a Newly Installed Black Limestone Patio in Horsforth

I was recently asked to work some Tile Doctor magic on a Black Limestone patio at a property in Horsforth, Leeds. The gentleman had just had the patio and steps paved with Black Limestone in time for the summer, however it had lost its rich dark colour due to the use of the wrong cleaning products and methods. The installer had literally bleached the colour out of the stone as well as etching it. The client had attempted to rectify this himself and made matters worse, so he called us in to see if we could put this right.

Faded Black Limestone Patio Before Renovation Horsforth Leeds

This is in fact a common problem with Black Limestone and Slate patios; builders typically use brick acid after laying a patio to remove excess grout or mortar, but this washes out the oils in the stone which give it that desirable Black colour. Also, many types of stone are sensitive to harsh chemicals such as acids and they can etch the stone.

Faded Black Limestone Patio Before Renovation Horsforth Leeds

I reassured my client that there was no need to worry and that I would be able to renovate the patio and restore the colour. We agreed a price, which he said he would pass onto the builder, and we arranged a time for the work to be carried out. We selected a couple of options, subject to the weather.

Cleaning and Restoring a Faded Black Limestone Tiled Patio Floor

Due to the etching the stone surface had experienced, my first job was to renovate the surface using a series of Tile Doctor Milling pads. These are fitted to a rotary buffer machine that has had extra weights added to increase traction. This was tricky on the steps but with a bit of persistence I endeavoured and successfully completed the first stage. The slurry generated by the pads was then rinsed off with water and this was then extracted with a wet vacuum.

Faded Black Limestone Patio During Renovation Horsforth Leeds

Sealing a Black Limestone Tiled Patio Floor

The patio was then left to dry, luckily, we had picked a good weather window, and the temperature was quite mild for this time of year. Once the moisture readings of the stone had dropped within the correct tolerance, I was able to start the second stage of the restoration which involved applying a sealer.

I chose Tile Doctor X-Tra Seal to seal this stone, applying two coats. This is an oil-based product that restores the beautiful Black colour to the limestone resulting in a nice finish. This product is also rated for external as well as internal use so ideal for this application.

My client was very happy with the result and relieved that we had managed to achieve the finish he had originally hoped for. They were delighted they could now use the new patio to its full potential throughout the summer.

Before leaving I recommended avoiding acidic cleaning products going forward and suggested they make use of our annual maintenance offering, we would then return every spring to get the patio ready for the summer.


Professional Restoration of a Black Limestone Tiled Patio in North Yorkshire

Colour Restored to a Newly Installed Black Limestone Patio in Horsforth Read More »

Old Flagstone Floor Before After Renovation Leeds

Restoring a Flagstone Tiled Kitchen Floor in Leeds

I was contacted by the owner of this property in Leeds about renovating their old Flagstone floor. The couple who owned the house both worked long hours so after discussing the floor at length over the phone and after reviewing several photographs they emailed me to ask me to go ahead and start work. I normally prefer to do a site visit beforehand so I can provide an accurate quote, clearly however this wasn’t going to possible in this case.

Flagstone Floor Before Grouting Cleaning Leeds

The owner had arranged for his father in law to let me into the property so I could start work. I was aware from the phone calls we had that there was an issue with the pointing, and I was prepared for this, but it was worse than I had anticipated with most of the grout missing or loose.

Interestingly the stone was quite yellow and so probably came from the Salts Mill area near Leeds. Sir Titus Salt was a 19th century industrialist and philanthropist built a large textile mill out of the stone. The mill is now a centre for art, dining and shopping and well worth a visit if your passing.

Cleaning and restoring a Flagstone Tiled Kitchen Floor

I decided to deal with the floor cleaning first and began by scrubbing the flagstones with a strong dilution of Tile Doctor Pro Clean using a rotary floor machine fitted with a scrubbing pad. The soil was then extracted using a wet vacuum and flagstones re-inspected. The remaining stubborn stains were spot treated using a repeat of the previous process until I was happy they were as clean as they could be.

As the floor dried I took out all the loose pointing and re grouted the whole floor with a mid grey grout which matched the old flagstones quite well. The floor was now looking vastly improved. The floor was then left to dry fully overnight to ensure the seal could be applied.

Sealing a Flagstone Tiled Kitchen Floor

I returned the following morning and tested the floor with the moisture meter, I was satisfied the floor was within the accepted parameters and we could now apply the sealant. I selected to use a couple of coats of Tile Doctor Colour Grow, allowing each coat to dry before applying the next one. This product enhances the colour but leaves a matt finish. It will form a durable protective seal to the floor which will ensure the floor is easier to maintain.

Flagstone Floor After Grouting Cleaning Leeds

I heard from the later that they were over the moon with the result and as part of the conversation we discussed the best way to maintain the floor going forward. Basically, this involves being careful with what you use to clean it as strong products can weaker the sealer. I recommend they use Tile Doctor Neutral Tile Cleaner which is pH neural and designed for the regular cleaning of sealed tiles.


Professional Restoration of a Flagstone Tiled Kitchen in North West Yorkshire

Restoring a Flagstone Tiled Kitchen Floor in Leeds Read More »

Ceramic Tiled Art Deco Bathroom After Cleaning Leeds

Cleaning a period bathroom in Leeds

I recently worked on a 1940s period Art Deco bathroom at a house in Leeds which I was very impressed by. The Ceramic tiling had been expertly laid and you have to admire the craftsmanship of the tiler considering they didn’t have the modern adhesive products and equipment we have today. The owner wanted the tiles given a deep clean, unfortunately on this occasion I forgot to take a picture before starting.

This really was a stunning example of an original bathroom. The ceramic tiles were of a very high quality and must have been designed and made to order to fit the room. The tiles were all original and had no cracks or tiles that were missing. The client had lived in the property for some time and they were keen to ensure the bathroom was maintained properly. I discussed with them that is was relatively easy job to get the tiles cleaned and as there was no grout the job would be straight forward.

Cleaning a Ceramic Tiled Bathroom

To clean the tiles, I decided to use Tile Doctor Duo Clean which is a fast and effective double action grout cleaner and mould remover. It cleans up grout and can remove mould and blackspot from grout and silicone. In this instance the tiles had been butt fitted so there was no grout to clean, this was a common practice in the past, but it is rare to see nowadays. I carefully worked the cleaner in with a six-inch white pad fitted to a hand buffer and then rinsed off with slightly soapy warm water. The soil was then extracted using the wet vacuum to keep the mess to a minimum. A tall step ladder was needed to reach the top third of the room as it was 12 feet tall. The high ceilings were a feature in the whole property which was stunning.

Sealing a Ceramic Tiled Bathroom

Once the tiles were almost dry, I then went over them with a clean white cloth to leave the surface smear free. Now normally I would look to apply a sealer at this point but due to the glazed nature of the ceramic tiles, this wasn’t necessary.

1940 Period Ceramic Tiled Art Deco Bathroom Afer Cleaning Leeds

This wasn’t the most difficult job you will find described on my website but it’s certainly one of my favourites which is why I felt I should share it. The client was very happy with the bathroom and I can completely understand given the height of the walls the decision to call someone in to clean it.


Professional Clean of an Art Deco Bathroom in North West Yorkshire

Cleaning a period bathroom in Leeds Read More »

Riven Slate Tiled Floor Renovation Horsforth

Cleaning and Sealing Riven Slate Floor Tiles in Horsforth

The pictures below are of a Riven Slate floor at a house in in the Leeds suburb of Horsforth which had been laid ten years prior. It’s probably difficult to appreciate from the images but the sealer on this floor was well worn through in the high traffic areas making it patchy in places. Without the protection of the sealer dirt was now ingrained in the pores of the stone leaving it looking dull. Riven slate is always tricky to clean thoroughly due to the rough surface and that combined with the ingrained dirt was making it very difficult to keep clean.

The floor now needed to be stripped of old sealer and then resealed and although I can provide a price for this over the phone my preference is to visit the property and survey the floor. In the case the owner had sent me some photographs via email however they were not too clear and so I felt it would be best if I paid the customer a visit to ensure I could give them an accurate price.

Slate Floor Before Cleaning Horsforth Leeds Slate Floor Before Cleaning Horsforth Leeds

The floor was indeed overdue a clean and seal, as suspected dirt was ingrained into the areas where the seal had worn off. The house was home to a very busy family, so the area was subject to the significant traffic. I carried out a test clean on a small area and they were surprised by the results, when you live with a floor for so long you don’t notice the very slow decline in its appearance. They agreed to my quote and we arranged a time to return and carry the deep clean out.

Cleaning a Riven Slate Tiled Kitchen Floor

When I arrived, I started off by protecting the skirting and surrounding woodwork. Given the rough surface of the floor I first applied Tile Doctor Wax Away which is a very effective coatings remover that is designed for removing wax but works very well in these situations. The product was left to dwell for a round ten minutes so it could get to work breaking down the old sealer and then scrubbed in using a black scrubbing pad fitted to a rotary machine.

This process removed most of the dirt and old sealer, but some stubborn patches remained. To treat these, I replaced the black pad with a coarse 200-grit burnishing pad and finally some handheld diamond burnishing blocks for the edges and corners where more intricate work was required, and the circular pads struggle to reach.

I gave the floor a rinse, and extracted the soil with a wet vacuum, the floor was then left to dry off overnight.

Sealing a Riven Slate Tiled Floor

The next day I returned, first the slate floor was checked for moisture using the moisture meter. Once I was happy it was within the correct parameters, I then sealed with four coats of Tile Doctor Seal and Go. This is a modern water-based blend of acrylic polymers that provides both a stain resistant surface seal and a durable low-sheen finish also being water based there’s no smell as it dries.

Slate Floor After Cleaning Horsforth Leeds Slate Floor After Cleaning Horsforth Leeds

The sealer really brought the stone to back to life and the lovely colours in the natural stones were now evident. The patchy appearance of the floor was gone, and the customer was happy.

I discussed with them how they should maintain the floor and advised them to use Tile Doctor Neutral Tile Cleaner. This is pH neutral cleaner that won’t prematurely erode the new sealer like the stronger products you find in Supermarkets which are only for use on Vinyl and Ceramic floors.


Professional Renovation of a Riven Slate Tiled Kitchen in North West Yorkshire

Cleaning and Sealing Riven Slate Floor Tiles in Horsforth Read More »

White Moleanos Limestone Kitchen Floor Before After Renovation Leeds

White Moleanos Limestone Kitchen Floor Renovated in Leeds

Moleanos Limestone is a very difficult stone to work with due to its’ porous chalky nature and needs to be sealed to prevent dirt accumulating in the stone. Without a sealer in place dirt builds up in the pores leaving it looking dirty and this is exacerbated in the case of White Moleanos Limestone which really shows up the dirt. I mention this as I was asked to visit a property in Leeds which had White Moleanos Limestone installed in the Kitchen and was now suffering this exact problem with the client unable to get it clean. The grout was also quite badly discoloured.

White Moleanos Limestone Kitchen Floor Leeds Before Cleaning White Moleanos Limestone Kitchen Floor Leeds Before Cleaning

I visited the property to survey the floor and quote for renovating the stone. I ran some tests and could see that as suspected the original sealer had broken down leaving the stone vulnerable. Sealers typically last around three to five years depending on use, but this can be significantly reduced if a strong household cleaning product is used to clean the floor.

Without a seal in place dirt was able to get into the porous stone and once ingrained it can be very difficult to remove without the right products and equipment. I completed a demonstration clean on a small area to show how the floor should look and the result was immediate. Confident I was able to get the floor clean my client booked me in and we agreed a date to complete the work.

Cleaning White Moleanos Limestone Kitchen Tiles

To restore the appearance of the stone I used a set of Tile Doctors Burnishing Pads which are encrusted with industrial diamonds and are used to hone the stone, remove dirt and restore its appearance. This is a slow steady process and involves working through the different grades of burnishing pads from coarse to very fine. The pads are applied with a small amount of water to lubricate and the soil generated by the process is extracted with a wet vacuum afterwards, to keep the mess to a minimum.

All the grout was cleaned by hand using a strong dilution of Tile Doctor Pro-Clean which is scrubbed into the grout lines by hand with a stiff brush. For best results I leave it to dwell for ten minutes before scrubbing, this allows it more time to break down and lift the dirt from the cementitious grout lines.

After cleaning I left the floor to dry off fully overnight.

Sealing a Moleanos Limestone Tiled Kitchen Floor

The following morning, I returned to the property and checked the floor was dry using a moisture meter. This is always worth checking as applying a sealer to a damp floor can result in a patchy appearance.

I had discussed the effects of the different sealers suitable for use on Limestone and the client specified they were after a natural look that wasn’t over shiny. With this in mind I selected Tile Doctor Ultra Seal which is a penetrating sealer formulated to provide maximum stain protection and is especially recommended for use in kitchen areas. Ultra-seal doesn’t change the look of the stone which made it a nice match for the client’s needs, it’s also a good grout sealer and will ensure the grout looks cleaner for longer.

Three coats of Ultra-Seal where applied allowing each one to dry before applying the next. With the new sealer in place the stone is protected from ingrained dirt and would prove to be much easier to keep clean in future.

White Moleanos Limestone Kitchen Floor Leeds After Cleaning White Moleanos Limestone Kitchen Floor Leeds After Cleaning

The client was very pleased with the finished result and before leaving I recommended, they maintain the floor using Tile Doctor Stone Soap which is designed for the cleaning of polished stone.


Professional Restoration of a Moleanos Limestone Tiled Kitchen in North West Yorkshire

White Moleanos Limestone Kitchen Floor Renovated in Leeds Read More »

Victorian Tiled Hallway Floor Before After Cleaning Headingley

Cleaning a Victorian Tiled Entrance Hall in Headingley, Leeds

I recently re-visited a Victorian period property in the Leeds suburb of Headingley which had an unusually large tiled entrance hall which we believe to be as old as the property itself. I say re-visited as I actually gave this floor a deep clean and reseal around five years ago; it’s always nice to be asked to return to a job as it shows the customers was very happy with the work. However, with five years of wear and tear the sealer had worn down and the floor was now starting to trap dirt, also it had lost the attractive shine added by the sealer and the owner felt it was time to have it done again. Additionally, the owner had recently had the whole house decorated and wanted the floor to look its best and match the fresh appearance of the property.

Large Victorian Tiled Hallway Before Cleaning Sealing Headingley

Sealers do wear off with use and so it is inevitable that the tiles will need to be cleaned and sealed again with time. Given it hadn’t had a professional clean and seal for five years the floor wasn’t looking too bad as you can see from the picture, it was just a bit dull in the high traffic areas such as along the centre. I’ve certainly seen a lot worse.

Cleaning a Victorian Tiled Hallway Floor

Initially I wasn’t 100% sure on which cleaning method l was going to use on this floor. Originally l thought about using a coarse 200-grit burnishing pad to take off a couple of layers of sealer and then re-apply 2 more coats. However, the finish on the floor wasn’t even across the width of the hallway and l felt using that approach wouldn’t resolve that. Additionally, a lot of tiles were pitted and a burnishing pad would struggle to get into the holes. So instead I decided to completely strip the floor and re-seal it which would ensure a uniform finish across the floor.

I used a strong 50:50 dilution of Tile Doctor Pro-Clean on the tiles and scrubbed it in with a black floor pad which removed the old sealer and ingrained dirt. The large floor pads are not very effective in the corners and edges, so I used a 6-inch red buffing pad fitted to a hand buffer for those. The floor was rinsed with water and the soil extracted using a wet vacuum. After inspecting the floor some areas were retreated with a repeat of the same process.
After a final rinse and extraction of the soiled water the floor was left to dry overnight.

Sealing a Victorian Tiled Hallway Floor

The next day after first checking the floor was dry with a damp meter it was sealed with four coats of Tile Doctor Seal and Go. This is a water based sealer that gives a lovely sheen and allows the colours to shine through as well as letting the floor breath, which is important in properties of this age that usually do not have a damp proof membrane.

I was very pleased with the finished result as the pictures show and glad that l had chosen to do a deep clean and not just apply more coats of sealer. The client was over the moon.

Large Victorian Tiled Hallway After Cleaning Sealing Headingley


Professional Restoration of a Victorian Tiled Hallway in North Yorkshire

Cleaning a Victorian Tiled Entrance Hall in Headingley, Leeds Read More »

Porcelain Tiled Shower Before After Grout Haze Removal Leeds

Grout Haze Removed from Textured Porcelain Shower Tiles in Leeds

These pictures show very fine textured porcelain tiles that had been installed in a shower cubicle at a property in Leeds that did not have the grout cleaned off properly. It’s worth knowing that we cover the whole city of Leeds which has one of the most diverse economies in the UK and is known as its second biggest legal and financial centre after London.

On arrival it was clear where the problem lay. Unfortunately, the tiler who had installed the tiles had not been very diligent in removing the excess grout afterwards leaving it to dry on the surface where it had become stuck in the surface of the textured tile. This is a problem commonly referred to as Grout Haze, the tiles are literally smeared in grout and once it has set no amount of household cleaner will remove the residue.

Textured Porcelain Tiles with Grout Haze Leeds

To add to the problem the situation with the grout haze had not been resolved after installation in-fact it had been fitted a few years prior and a build-up of soap scum and stains from the dyes in shampoo products had made the shower cubicle look worse.

Tile Doctors have a solution for every problem and I knew exactly how to remove the grout smearing and revamp the whole shower cubicle. Confident I could get them cleaned up in less than a day we agreed a price and booked the work in to be done.

Textured Porcelain Tiles with Grout Haze Leeds Textured Porcelain Tiles with Grout Haze Leeds

Cleaning Porcelain Tiled Shower Cubicle

Before tackling the Grout Haze, I needed to clean the tile and grout, so I started with an application of Tile Doctor Oxy-Gel which being a gel sticks well to vertical surfaces such as wall tiles allowing it dwell longer and really breakdown the dirt. I worked on one square metre at a time leaving it to dwell for ten minutes and then scrubbed in with a scouring pad. The area is quite small, so it was easiest to do the work by hand rather than using the rotary hand buffer. The area was then rinsed thoroughly to remove the soil and any remaining product.

Next while the tile was still wet l applied Tile Doctor Grout Clean-up to tackle the grout smears. Grout Clean-up is an acid, so you do need to be careful however it is the only thing that will remove grout once it’s dried, also I wouldn’t recommend using it on natural stone as it can etch the surface however these tiles were Porcelain. The process worked well although some tiles needed to be re-treated to get rid of all the smears.

I rinsed again with water and then dried with a heat gun to make sure no marks or stains came back when completely dry. Happy that the tiles and grout were now as clean as possible, and the area was fully dried out, all that remained was to strip out the old stained silicone sealer and replace with new.

Silicone Sealing a Porcelain Tiled Shower Cubicle

We do have a product called Duo-Clean that can clean up silicone but my preference in this case was to strip out the old with a sharp knife and replace with new. I find this really adds to the renovation of the cubicle completing the transformation. It also ensures the cubicle is left waterproof and less likely to have a leak develop in the old silicone in future.

Textured Porcelain Tiles after Grout Haze Removed Leeds Textured Porcelain Tiles after Grout Haze Removed Leeds

It is amazing the difference the clean-up made. The client now has the shower cubicle they had hoped for and are happy to use every day, they were very pleased with the results.

Textured Porcelain Tiles after Grout Haze Removed Leeds


Professional Shower Cubicle Renovation in North Yorkshire

Grout Haze Removed from Textured Porcelain Shower Tiles in Leeds Read More »

Ceramic Kitchen Floor Tiles and Terracotta Window Sills Restored in Sherburn-in-Elmet

Ceramic Kitchen Floor Tiles and Terracotta Window Sills Restored in Sherburn-in-Elmet

At Tile Doctor, we have completed a wide variety of restoration jobs, from very large floors in hotels and restaurants to smaller floors in kitchens and bathrooms. We also often work on different surface types, including shower cubicles and stone or tiled window sills. I recently visited the small village of Sherburn-in-Elmet in Leeds to complete two small, but very different, jobs for a customer.

The first was the restoration of a Ceramic tiled kitchen floor that was really looking worse for wear. The grout lines had accumulated a lot of dirt over the years and the tiles themselves had been stained by what appeared to be plaster dust.

Ceramic Floor Tiles Before Cleaning in Sherburn in Elmet Kitchen
The second was the restoration of several window sills made from Catalan-style Terracotta. The stone had originally been covered in four to six coats of Yacht Varnish, which had left an unsightly white crusted covering. Naturally, the customer was keen to see the sills restored to their original, natural look.

Catalan Terracotta Window Sill Sherburn in Elmet Before Cleaning

Cleaning a Ceramic Tiled Kitchen Floor

After removing the kickboards from underneath the kitchen units, I used a handheld scrapper and a wire brush to manually remove most of the plaster dust. Next, I applied a solution of Tile Doctor Pro-Clean, which is a high alkaline tile and grout cleaner, across the floor.

By scrubbing the Pro-Clean into the tiles and grout I removed all the dirt and staining. As the tiles were fully glazed Ceramic, they did not need to be sealed.

Ceramic Floor Tiles After Cleaning in Sherburn in Elmet Kitchen

Cleaning and Sealing Terracotta Window Sills

The white crusted powder covering the Catalan Terracotta window sills was caused by Yacht Varnish, which would need to be removed before I could properly clean the stone below. I removed it using a combination of Tile Doctor Remove and Go, which is a heavy-duty stripper, and Tile Doctor NanoTech HBU, a powerful cleaner which uses nano-sized particles penetrates difficult-to-reach areas. Together they make a powerful stripper/cleaning solution.

This solution was left to work its magic for two hours, before I applied a handheld scrapper and wire brush to remove the white coating. Next, I rinsed the sills with water and then deep cleaned them again with Tile Doctor Pro-Clean.

The window sills were subsequently left to dry off completely overnight. I popped back to the property the next day to seal them with two coats of Tile Doctor Colour Grow, an impregnating sealer which intensified the natural shades in the stone and provided a natural-looking matte finish.

Catalan Terracotta Window Sill Sherburn in Elmet After Cleaning
Two quick jobs completed to a high standard and one very satisfied customer.

Professional Tile Cleaning and Sealing for a Ceramic Tiled Kitchen Floor Restoration and Terracotta Window Sill Restoration in Leeds

Ceramic Kitchen Floor Tiles and Terracotta Window Sills Restored in Sherburn-in-Elmet Read More »

Botched Yorkstone Tiled Floor Instalation Resolved in Guiseley

Botched Yorkstone Tiled Floor Instalation Resolved in Guiseley

In an interesting turn of events, I was recently contacted again by a homeowner from Guiseley, near Leeds, with whom I had been in touch with two years prior. At that time, I had quoted for cleaning and maintenance work to be carried out on a Yorkshire Stone, or ‘Yorkstone’ tiled floor, but the customer had opted to go with a different company. Yorkstone is a variety of Sandstone that it unique to the quarries of Yorkshire.

When the customer called me again, she explained that the previous work – most likely carried out by inexperienced cowboy builders – had been disastrous. The stone evidently had not bene properly cleaned and very little sealer had been used to protect it against wear and tear. The result was a very dirty and dusty floor – and the only solution was to start the restoration process over again, this time with the help of a true professional!

Here’s a photo of what the floor looked like before the restoration:

Yorkshire Stone Floor Guiseley Leeds Before Cleaning

Cleaning Dull and Dirty Yorkstone Tiles

Since the floor had not been cleaned properly to begin with, there were several unsightly paint stains on the stone in addition to general dirt and stains. To remove these, I applied Tile Doctor Pro Clean, which is a reliable alkaline cleaner, liberally across the floor and left it dwell for a short period. I then used a wire brush to scrub away the muck.

The customer had asked the builder to grout the tiles to reduce the likelihood of trapped dirt and make the floor feel complete. For whatever reason, builder either wouldn’t or couldn’t oblige, so I grouted the whole floor as well, much to the customer’s delight.

Sealing Yorkstone Tiles

Once the floor was fresh and clean, it was left to dry completely so it could subsequently be sealed.

My choice of sealer was Tile Doctor Seal and Go, a topical sealer which provides both a stain resistant surface seal and a durable and aesthetically-pleasing low-sheen finish to really enhance the character of the stone. Four coats of sealer were used in total to ensure maximum protection.

Here’s what the floor looked like after the restoration:

Yorkshire Stone Floor Guiseley Leeds After Cleaning

After cowboy builders had botched the job, the customer was exceptionally happy that the situation had finally been put right. The floor is now in top shape and will be protected against wear and tear for a long time to come.

Professional Restoration of a Dirty Yorkstone Tiled Floor in North Yorkshire

Botched Yorkstone Tiled Floor Instalation Resolved in Guiseley Read More »

Paint Spotted Victorian Tiled Hallway Deep Cleaned in Leeds

Paint Spotted Victorian Tiled Hallway Deep Cleaned in Leeds

Details below of a Victorian Tiled Hallway Floor that I deep cleaned and sealed at a house in Leeds. It has previously been covered in carpet which had been removed before I got there.

The tiles were in good physical condition, just looking dull and there were traces of paint spots and glue residue from double sided tape that had held down the carpet. Worse of all there an imprint had bleed into the tiles from under lay that must have been damp. Dampness can be a problem for these old floors which were laid before the invention of damp proof membranes.

Victorian Tiled Hallway Floor Before Cleaning Leeds Victorian Tiled Hallway Floor Before Cleaning Leeds

Restoring a Victorian Tiled Hallway

Normally I use a series of Tile Doctor chemical products to deep clean Victorian tiles however I felt this would not deal with the imprint. Therefore on this occasion I started with the application of a coarse 200 grit diamond pad fitted to a weighted rotary machine and lubricated with a little water. The pads can struggle to reach into the edges and corners so to get those clean I used a 200 grit hand held block.

This removed the imprint, paint spots and glue residue and I was then able to lift the ingrained dirt out of the floor by applying a dilution of Tile Doctor Pro-Clean. The Pro-Clean was left to soak into the floor for a good ten minutes before working it in with a black scrubbing pad.

I extracted the soiled cleaning solution using a wet vacuum and then gave the floor a rinse with water, again using the wet vacuum to remove as much moisture as possible. The result of my cleaning efforts was excellent with 95% of the marks now removed and just a faint imprint left on a few tiles.

Sealing a Victorian Tiled Hallway

I left the floor to dry overnight and was able to return the next day, checked the moisture levels using a damp meter and then proceeded to seal the floor.

To seal I applied four coats of Tile Doctor Seal and Go which adds a lovely satin finish that really lifted the look of the Victorian floor tiles.

Victorian Tiled Hallway Floor After Cleaning Leeds Victorian Tiled Hallway Floor After Cleaning Leeds

Needless to say the customer was delighted with the finish and difference.

Professional Victorian Tiled Hallway Restoration in West Yorkshire

Paint Spotted Victorian Tiled Hallway Deep Cleaned in Leeds Read More »

Scroll to Top